How Can You Repaint Golf Club Heads
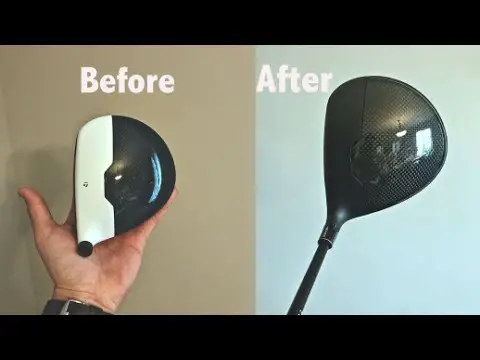
Golf clubs are one of the most important tools for a golfer, and their appearance can make a difference in how a golfer feels about using them. Over time, the paint on golf club heads can become chipped, faded, and worn, which not only affects the aesthetics but can also negatively impact the performance of the clubs. Repainting golf club heads is a cost-effective and simple way to restore their appearance and improve their performance.
Repainting golf club heads can be a fun and rewarding project, but it’s important to do it right to achieve a professional-looking finish. In this article, we will provide a comprehensive guide on how to repaint golf club heads, including preparing the club heads, painting the club heads, and curing and finishing the club heads. We will also provide tips and tricks for repainting golf club heads and choosing the right paint.
Whether you’re an experienced golfer or just starting out, repainting your golf club heads is a great way to restore their appearance and improve their performance on the golf course. By following the steps outlined in this guide, you can easily repaint your golf club heads and enjoy their renewed appearance and performance. So, let’s dive in and learn how to repaint your golf club heads like a pro.
Preparing the Golf Club Heads
The first step in repainting golf club heads is to prepare them. This involves removing the old paint, sanding the club heads, cleaning the club heads, and taping the club heads.
Removing the Old Paint
The old paint on the club heads must be removed before repainting. This can be done by using paint stripper or sandpaper. If using paint stripper, it’s important to follow the manufacturer’s instructions and wear protective gloves and eyewear. Sandpaper can also be used to remove the old paint, but it requires more time and effort.
Sanding the Club Heads
After the old paint is removed, the club heads must be sanded to provide a smooth surface for the new paint. Sandpaper with a fine grit should be used to avoid scratching the club heads. It’s important to sand evenly and not to remove too much material from the club heads.
Cleaning the Club Heads
Once the club heads are sanded, they must be thoroughly cleaned to remove any dust, dirt, or debris. A cloth or paper towel dampened with rubbing alcohol can be used to clean the club heads.
Taping the Club Heads
To avoid getting paint on the shafts or grips of the golf clubs, the club heads must be taped. Painter’s tape or masking tape can be used to cover the areas of the club heads that should not be painted.
Painting the Golf Club Heads
After the club heads are prepared, they are ready to be painted. This involves choosing the right paint, applying primer, applying the base coat, applying the top coat, and adding a clear coat.
Choosing the Right Paint
Choosing the right paint is important for the longevity and appearance of the repainted club heads. Spray paint designed for metal surfaces is recommended, and it’s important to choose a paint that is durable and resistant to chipping and fading.
Applying Primer
Before applying the base coat, a primer must be applied to the club heads. The primer provides a smooth surface for the base coat to adhere to and helps prevent the paint from chipping or peeling.
Applying the Base Coat
After the primer is applied and allowed to dry, the base coat can be applied. It’s important to choose a color that complements the golf clubs and to apply the paint evenly.
Applying the Top Coat
Once the base coat is dry, the top coat can be applied. The top coat provides a protective layer and enhances the appearance of the club heads. It’s important to apply the top coat evenly and to avoid applying too much paint, which can cause the paint to run or drip.
Adding a Clear Coat
After the top coat is dry, a clear coat can be applied to provide an extra layer of protection. The clear coat should be applied evenly and allowed to dry completely.
Curing and Finishing the Golf Club Heads
After the paint is applied, the club heads must be cured and finished. This involves curing the paint, removing the tape, touching up any imperfections, polishing the club heads, and reassembling the golf clubs.
Curing the Paint
After the clear coat is dry, the club heads must be cured to ensure that the paint is fully hardened. This can be done by allowing the club heads to dry for at least 24 hours or by placing them in a warm and dry area for a few hours.
Removing the Tape
After the paint is cured, the tape can be removed from the club heads. It’s important to remove the tape carefully to avoid damaging the new paint.
Touching Up Any Imperfections
After the tape is removed, any imperfections or areas that need touching up can be addressed. This can be done by using a fine brush and a small amount of paint to carefully touch up any areas that need attention.
Polishing the Club Heads
After any necessary touch-ups are completed, the club heads can be polished to restore their shine and luster. A polishing cloth or buffing wheel can be used to polish the club heads.
Reassembling the Golf Clubs
After the club heads are polished, they can be reassembled onto the golf clubs. It’s important to take care when reassembling the clubs to avoid scratching or damaging the newly painted club heads.
Tips and Tricks for Repainting Golf Club Heads
Repainting golf club heads can be a fun and rewarding project, but it’s important to do it right. Here are some tips and tricks to keep in mind:
- Choose a paint that is designed for metal surfaces and is durable and resistant to chipping and fading.
- Apply the paint in thin and even coats to avoid runs or drips.
- Allow each coat of paint to dry completely before applying the next coat.
- Use painter’s tape or masking tape to protect the shafts and grips of the golf clubs.
- Consider using stencils or decals to add custom designs or logos to the repainted club heads.
- Store repainted golf club heads in a dry and cool area to avoid chipping or fading.
Conclusion
Repainting golf club heads is a cost-effective way to restore their appearance and improve their performance. By following the steps outlined in this guide, you can easily repaint your golf club heads and enjoy their renewed appearance and performance on the golf course. Remember to choose the right paint, prepare the club heads properly, and take your time to ensure a quality finish. With these tips and tricks, you can enjoy a fun and rewarding project while enhancing your golf equipment.