How To Replace Golf Spikes
Proper traction and stability are essential for every golfer’s performance on the course, and golf spikes play a vital role in achieving these qualities. Over time, spikes can wear out, lose their grip, or become damaged, requiring replacement. Knowing how to replace golf spikes is a valuable skill that ensures you maintain optimal performance and prevent slips or falls during your swings.
In this comprehensive guide, we will take you through the step-by-step process of replacing golf spikes. From assessing the need for replacement to gathering the necessary tools and executing the replacement, we will provide you with all the information you need to successfully replace your spikes. Whether you’re a seasoned golfer or just starting, this guide is designed to help you navigate the process with ease.
By learning how to replace golf spikes, you not only save money by avoiding professional assistance but also have the freedom to customize your spikes to suit your playing style and course conditions. So, let’s dive in and equip you with the knowledge and skills to replace your golf spikes confidently and maintain your performance at its peak. Get ready to step onto the course with a sure-footed stride and tackle any golfing challenge that comes your way.

Why Replace Golf Spikes: Understanding the Importance
Golf spikes play a crucial role in providing traction and stability during your swings. As you walk on various terrains, the spikes grip the ground, preventing slips and enhancing your balance. However, over time, spikes can wear down, lose their sharpness, or even break. When this happens, it’s important to replace them for several reasons:
- Traction: Worn-out spikes can significantly reduce traction, affecting your stability during swings and compromising your overall performance.
- Safety: Damaged spikes may pose a safety risk, as they can cause slips or falls on wet or uneven surfaces.
- Course Maintenance: Golf courses often have specific rules regarding spike types. By replacing worn-out spikes, you ensure compliance with course regulations and help preserve the course’s condition.
Assessing Your Golf Spikes: Type, Condition, and Replacement Options
Before replacing your golf spikes, it’s important to assess the type of spikes on your shoes, their condition, and explore replacement options.
Spike Types:
Golf spikes are typically available in three main types: plastic, metal, and hybrid. Each type has its own characteristics and benefits:
| Spike Type | Description | Benefits |
|---|---|---|
| Plastic | Made of durable plastic material. | Lightweight, versatile, and gentle on the golf course. |
| Metal | Constructed with metal threads for enhanced traction. | Provides excellent grip, especially in wet conditions. |
| Hybrid | Combination of plastic and metal elements. | Offers a balance between traction and versatility. |
Assess the type of spikes on your shoes and consider your playing style, course conditions, and personal preferences when choosing replacements.
Evaluating Spike Condition:
Inspect your current spikes to determine if they need replacement. Look for the following signs:
- Wear and Tear: Check for signs of excessive wear, such as flattened or rounded spikes that no longer provide adequate grip.
- Damage: Look for broken or bent spikes that can compromise stability and effectiveness.
- Clogged Debris: If your spikes are filled with dirt, grass, or other debris, they may not function optimally.
By assessing the condition of your spikes, you can determine if replacement is necessary.
Replacement Options:
When it comes to replacing golf spikes, you have a range of options to choose from. Spike manufacturers offer various replacement sets, often compatible with different shoe brands and models. Consider the following factors when selecting replacement spikes:
- Compatibility: Ensure that the replacement spikes are compatible with your specific shoe model and brand.
- Spike Length: Choose the appropriate spike length based on the type of terrain you typically play on. Longer spikes provide better grip on softer ground, while shorter spikes work well on firmer surfaces.
- Thread Type: Different shoes may require different thread types, such as Q-LOK, Fast Twist, or Slim-Lok. Ensure that the replacement spikes match the thread type of your shoes.
Research available replacement options and choose the ones that best suit your needs.
Gathering the Necessary Tools and Replacement Spikes
Before you begin
the spike replacement process, it’s essential to gather the required tools and replacement spikes. Here’s what you’ll need:
- Spike Wrench: A spike wrench is a specialized tool designed to remove and tighten golf spikes. It provides a secure grip and makes the replacement process easier. Most spike wrenches have different sized heads to accommodate various spike types.
- Pliers: In the absence of a spike wrench, a pair of pliers can be used as an alternative tool for removing and tightening spikes. Choose pliers with a narrow and firm grip to ensure effective handling.
- Replacement Spikes: Select the appropriate replacement spikes based on the type, length, and thread compatibility discussed earlier.
Having the necessary tools and replacement spikes ready will streamline the replacement process and ensure a smooth transition.
Removing the Old Spikes: Step-by-Step Process
Now that you’ve gathered the tools and replacement spikes, it’s time to remove the old spikes from your golf shoes. Follow these step-by-step instructions:
- Clean the Sole: Before removing the old spikes, clean the sole of your golf shoes to remove any dirt or debris that could interfere with the removal process. Use a soft brush or cloth to ensure the sole is free from any obstructions.
- Secure Your Shoe: To provide stability while removing the spikes, place the shoe on a flat surface, and apply gentle pressure to hold it in place. This will prevent the shoe from moving or rotating during the process.
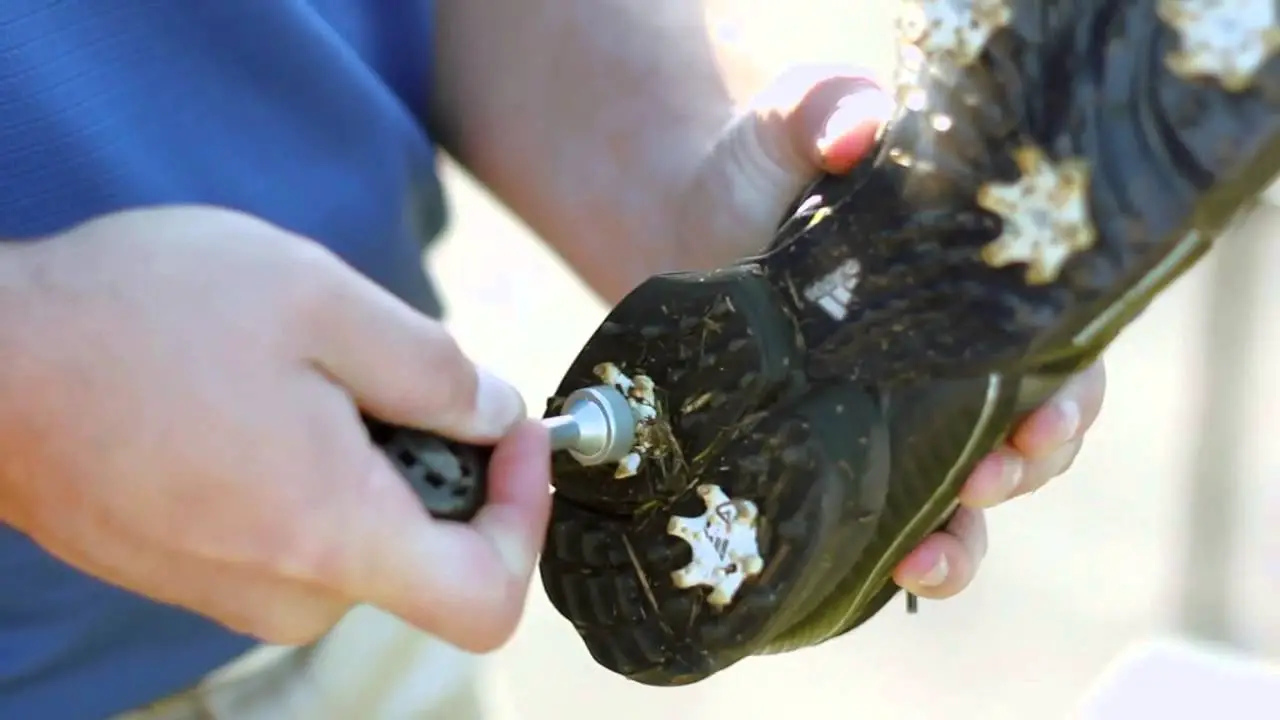
- Using a Spike Wrench:
- Insert the appropriate head of the spike wrench into the spike’s receptacle or the small hole on the spike.
- Firmly grip the spike wrench, applying counterclockwise force to loosen the spike.
- Continue turning until the spike is fully loosened and can be removed by hand.
- Repeat this process for each spike on the shoe.
- Using Pliers (Alternative Method):
- If you don’t have a spike wrench, you can use pliers as an alternative tool for spike removal.
- Gently grip the spike as close to the shoe’s sole as possible.
- Rotate the pliers counterclockwise to loosen the spike.
- Once the spike is loosened, remove it by hand.
- Repeat this process for each spike on the shoe.
Remember to exercise caution while using pliers to avoid damaging the shoe or the spike threads.
Inserting the New Spikes: Step-by-Step Process
After successfully removing the old spikes, it’s time to insert the new ones. Follow these step-by-step instructions to ensure proper installation:
- Align the Replacement Spikes: Take the replacement spikes and align them with the corresponding holes on the shoe’s sole. Ensure that the spikes are positioned correctly before proceeding.
- Insert the Spikes: Firmly press each replacement spike into its respective hole. Apply downward pressure while rotating the spike clockwise to engage the threads. Continue until the spike is fully inserted and secure in the shoe.
- Hand-Tighten the Spikes: Using your fingers, tighten the spikes by rotating them clockwise. Ensure they are snug but not overly tightened. Hand-tightening provides a good initial grip while allowing for further adjustment if needed.
- Verify Spike Placement: Once all the spikes are inserted and hand-tightened, check their alignment and position. Make sure they are uniformly seated and not protruding at odd angles.
- Fine-Tuning with Spike Wrench (Optional): If desired, you can use the spike wrench to further tighten the spikes. Insert the appropriate head of the spike wrench into the spike’s receptacle and gently apply clockwise force to secure the spikes. Take care not to overtighten, as it can damage the shoe or strip the spike threads.
By following these steps, you’ll ensure that the new spikes are properly installed, providing optimal grip and stability on the golf course.
Verifying Spike Placement and Stability
After replacing the spikes, it’s important to verify their placement and stability. Take the following steps to ensure the spikes are securely in place:
- Visual Inspection: Check each spike individually, visually confirming that it is seated correctly in the shoe’s sole. Ensure there are no gaps or misalignment.
- Finger Test: Run your fingers over the spikes, verifying that they are uniformly positioned and securely tightened. Confirm that there is no excessive movement or wobbling.
- Test on Different Surfaces: Take a few steps on different surfaces, such as grass, gravel, or artificial turf, to assess the stability and grip of the new spikes. Pay attention to any signs of slippage or discomfort.
If you notice any issues during the verification process, revisit the insertion steps and make necessary adjustments or reinstallation as required.
Post-Replacement Care and Maintenance Tips
Once you’ve successfully replaced the golf spikes, it’s important to maintain them properly for longevity and optimal performance. Consider the following care and maintenance tips:
- Regular Cleaning: After each round of play, clean your golf shoes, including the spikes, to remove any dirt or debris that may accumulate. Use a soft brush or cloth to gently scrub the spikes and the sole.
- Inspect Spikes Regularly: Periodically inspect your spikes for signs of wear, damage, or clogging. Replace any worn-out or damaged spikes promptly to maintain consistent traction and stability.
- Proper Storage: Store your golf shoes in a cool, dry place, preferably in a shoe bag or box, to protect them from excessive moisture or temperature fluctuations. Avoid storing them in direct sunlight or damp environments.
- Scheduled Replacements: Even with proper care, spikes will eventually wear out. Create a schedule for replacing your spikes based on your frequency of play and the condition of the spikes. Regularly check the manufacturer’s recommendations for guidance.
By following these care and maintenance tips, you’ll ensure that your golf spikes remain in top condition, providing reliable traction and stability on the course.
Exploring Different Spike Types and Considerations
While replacing your golf spikes, it’s worth exploring the different spike types available and considering relevant factors. Let’s delve into the characteristics, benefits, and considerations for each type:
Plastic Spikes:
Plastic spikes are a popular choice due to their versatility and comfort. They offer the following benefits:
- Versatility: Plastic spikes perform well on various terrains, including soft and firm ground.
- Comfort: They provide a cushioned feel while walking, reducing foot fatigue during long rounds.
- Gentle on Greens: Plastic spikes are less likely to damage putting greens, making them preferred on courses with strict spike regulations.
Metal Spikes:
Metal spikes offer exceptional traction, especially in wet conditions. Consider the following aspects when contemplating metal spikes:
- Superior Grip: Metal spikes dig into the ground, providing excellent stability and traction, particularly on wet grass or hilly terrain.
- Durability: Metal spikes are known for their durability, often outlasting plastic counterparts.
- Course Restrictions: Some golf courses have restrictions on metal spikes due to their potential to damage greens. Ensure you comply with course regulations before using metal spikes.
Hybrid Spikes:
Hybrid spikes combine elements of both plastic and metal, aiming to strike a balance between traction and versatility. Key points to consider for hybrid spikes include:
- Traction and Comfort: Hybrid spikes provide a blend of traction similar to metal spikes while offering the comfort and versatility of plastic spikes.
- Course Regulations: Hybrid spikes are generally accepted on most golf courses, but it’s advisable to check course-specific regulations.
Ultimately, the choice of spike type depends on personal preference, playing style, course conditions, and any regulations in place.
Conclusion:
Replacing golf spikes is a fundamental aspect of maintaining optimal traction and stability on the golf course. By following the step-by-step guide and considering the different spike types and factors, you can ensure a smooth replacement process and enjoy improved performance during your rounds. Remember to regularly inspect and replace worn-out spikes, clean your golf shoes, and store them properly. With properly maintained spikes, you’ll be ready to tackle the fairways with confidence and enjoy the best possible golfing experience.