How To Use A Golf Rangefinder
Are you ready to take your golf game to the next level? Using a golf rangefinder can be a game-changer when it comes to precision and accuracy on the course. Whether you’re a seasoned golfer or just starting out, understanding how to use a golf rangefinder effectively is essential for improving your distance measurements and course management.
In this comprehensive guide, we will walk you through everything you need to know about using a golf rangefinder. From getting familiar with the device to utilizing advanced features and overcoming common challenges, we’ve got you covered. We’ll provide you with practical tips, step-by-step instructions, and expert advice to help you make the most of this valuable tool.
But first, let’s start with the basics. What exactly is a golf rangefinder? A golf rangefinder is a device that allows you to accurately measure distances on the golf course. It provides you with precise yardages to various targets, helping you select the right club and make more informed shot decisions. Whether you opt for a GPS-based rangefinder or a laser rangefinder, the goal remains the same – to improve your game through accurate distance measurements.
So, if you’re ready to enhance your golfing experience and lower your scores, let’s dive into the world of using a golf rangefinder. Strap on your golf bag, grab your rangefinder, and let’s get started on this exciting journey!
What is a Golf Rangefinder?
Before we dive into the details, let’s start by understanding what exactly a golf rangefinder is and how it can benefit your game. A golf rangefinder is a device that helps golfers accurately measure distances on the course, allowing for better club selection and shot execution. We’ll explore the different types of golf rangefinders, including GPS-based and laser rangefinders, and discuss their advantages and limitations.
Getting Familiar with Your Golf Rangefinder
To make the most of your golf rangefinder, it’s essential to understand its various components and features. We’ll walk you through the different buttons, modes, and settings commonly found on a golf rangefinder. Familiarizing yourself with these features will ensure you can navigate your rangefinder with ease and precision.
Preparing Your Golf Rangefinder for Use
Before you head out to the course, there are a few important steps to take to ensure your golf rangefinder is ready for action. We’ll guide you through the process of charging or replacing batteries, calibrating the rangefinder for accurate measurements, and adjusting settings such as the unit of measurement and slope mode.
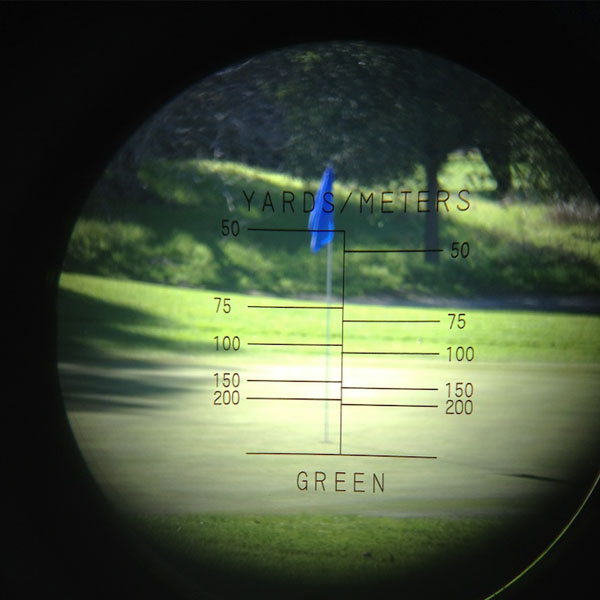
Using a Golf Rangefinder for Distance Measurements
Now, let’s dive into the heart of the matter – using your golf rangefinder to measure distances on the course. We’ll provide you with a step-by-step guide on how to effectively use the rangefinder to determine distances to various targets. You’ll learn proper aiming techniques, interpreting the distance readings, and overcoming common challenges you may encounter.
Utilizing Advanced Features and Modes
Beyond basic distance measurements, many golf rangefinders offer advanced features and modes that can further enhance your game. We’ll explore these additional capabilities, including pin-lock technology, target scanning, and continuous measurement. Understanding and utilizing these features will allow you to make more informed decisions on the course.
Overcoming Challenges and Best Practices
Using a golf rangefinder may present some challenges, especially in certain weather conditions or on hilly courses. We’ll provide you with practical tips and best practices to overcome these challenges and ensure accurate measurements. You’ll discover how to adapt your rangefinder usage to different situations and maximize its effectiveness.
Maintaining and Caring for Your Golf Rangefinder
To keep your golf rangefinder in optimal condition, proper maintenance is key. We’ll discuss important cleaning and storage practices, as well as guidelines for battery maintenance and replacement. Additionally, we’ll cover the importance of regular calibration and software updates, if applicable to your rangefinder model.
Golf Rangefinder Etiquette and Rules
Using a golf rangefinder comes with certain etiquette and rules that should be followed on the course. We’ll explain the guidelines set by golf courses regarding the use of rangefinders and provide tips on proper etiquette to ensure a smooth and respectful golfing experience. Respecting pace of play and fellow golfers is paramount.
Conclusion
By mastering the art of using a golf rangefinder, you can gain a significant edge on the course. The accuracy and precision provided by this handy device can revolutionize your distance measurements and course management. So, take the knowledge and tips shared in this guide, put them into practice, and watch your game reach new heights. Get ready to make every shot count with the help of your trusty golf rangefinder!