How To Wire Turn Signals On A Golf Cart

Golf carts have become more than just vehicles for traversing the greens. They are now used in various settings, including neighborhoods, resorts, and commercial areas. With this increased usage, ensuring the safety of golf cart drivers and pedestrians has become a top priority. One crucial safety feature is the installation of turn signals on golf carts, allowing drivers to communicate their intentions and navigate with confidence.
In this comprehensive guide, we will walk you through the process of wiring turn signals on a golf cart. Whether you’re a golf enthusiast or use your golf cart for transportation purposes, installing turn signals can significantly enhance safety and promote responsible driving.
Understanding the importance of turn signals and the benefits they offer sets the foundation for this guide. From increased visibility and clear communication to legal compliance, the advantages of installing turn signals on your golf cart are numerous.
Throughout the guide, we will provide detailed step-by-step instructions, practical tips, and important considerations to ensure a successful wiring installation. From assessing your golf cart’s electrical system to selecting the right turn signal kit and performing the wiring connections, we’ll cover all the essential aspects.
By the end of this guide, you’ll have the knowledge and confidence to wire turn signals on your golf cart, enabling you to navigate with ease, communicate your intentions to others, and ensure a safe and enjoyable driving experience. So, let’s get started on this journey towards improved safety and responsible driving on your golf cart.

Understanding the Importance of Turn Signals on a Golf Cart
Turn signals play a crucial role in ensuring safe and efficient operation of any vehicle, including golf carts. By providing clear indications of your intended direction, turn signals help other drivers and pedestrians understand your movements, reducing the risk of accidents and promoting smoother traffic flow.
When it comes to golf carts, which are increasingly being used beyond golf courses, installing turn signals becomes even more essential. Whether you’re driving your golf cart in a residential community, campground, or commercial area, having functional turn signals allows you to communicate your intentions effectively and enhances overall safety.
Benefits of Installing Turn Signals on a Golf Cart
Installing turn signals on your golf cart offers several benefits:
- Enhanced Safety: Turn signals provide clear indications of your intended direction, alerting other drivers and pedestrians to your movements and reducing the risk of collisions.
- Improved Visibility: The presence of turn signals increases your golf cart’s visibility, especially in low-light conditions or during inclement weather. This makes it easier for others to see you, promoting safer interactions on the road.
- Legal Compliance: In many jurisdictions, golf carts are required to have functional turn signals when operated on public roads or in certain designated areas. Installing turn signals ensures compliance with local regulations and avoids potential fines or penalties.
Now, let’s delve into the step-by-step process of wiring turn signals on your golf cart, allowing you to drive with confidence and safety.
Preparing for the Wiring Process
Before proceeding with the wiring process, it’s important to properly prepare and gather the necessary materials and tools. This ensures a smooth and successful installation of turn signals on your golf cart.
Assessing Your Golf Cart’s Electrical System
The first step is to assess your golf cart’s electrical system. Understand how it is wired and powered, as this knowledge will guide you in the installation process. Take note of the battery voltage, the presence of a voltage reducer (if applicable), and the availability of pre-existing wiring connections. A clear understanding of your golf cart’s electrical system is crucial for a successful installation.
Selecting the Right Turn Signal Kit
Choosing the right turn signal kit is a critical step in the process. Look for kits specifically designed for golf carts, as they will come with the necessary components and instructions tailored to your vehicle. Consider factors such as compatibility with your golf cart model, the quality of components, ease of installation, and any additional features you may desire. Reading customer reviews and seeking recommendations from fellow golf cart enthusiasts can help you make an informed decision.
Now that you have assessed your golf cart’s electrical system and selected the appropriate turn signal kit, it’s time to move on to the wiring process. Follow the steps outlined below to ensure a successful installation.
Wiring Turn Signals on Your Golf Cart
Step 1: Install the Turn Signal Switch
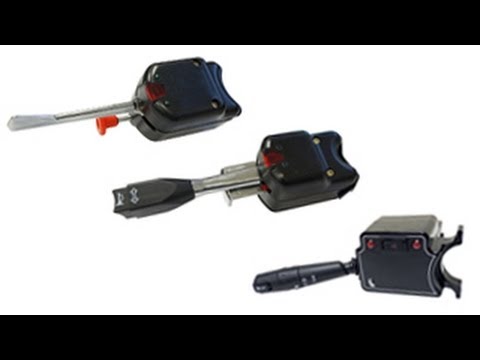
The turn signal switch serves as the control mechanism for your golf cart’s turn signals. It allows you to activate the turn signals to indicate your intended direction. The switch should be mounted in a convenient and accessible location on your golf cart’s dashboard or steering column.
Refer to the instructions provided with your turn signal kit to properly install the switch. Follow the manufacturer’s guidelines for mounting the turn signal switch. Typically, the switch will require a secure attachment to the dashboard or steering column using screws or adhesive. Ensure that the switch is positioned for easy reach while maintaining clear visibility of other controls on the golf cart.
Step 2: Mount the Turn Signal Lights
Next, you will need to mount the turn signal lights on your golf cart. These lights are essential for indicating your intended direction to other drivers and pedestrians. The lights should be positioned in a way that provides maximum visibility to those around you.
Consider mounting the turn signal lights on the front and rear of your golf cart, on both the left and right sides. This ensures that your signals are visible from all angles. Refer to the instructions provided with your turn signal kit for specific guidelines on proper light placement and mounting techniques.
Ensure that the lights are securely attached to the golf cart’s body or designated light mounting brackets. Use screws or bolts provided in the kit to fasten the lights in place. Double-check that the lights are aligned properly and face the correct direction for clear visibility.
Step 3: Connect the Wiring
Properly connecting the wiring is crucial for the functionality of your turn signals. Follow the wiring diagram provided with your turn signal kit to ensure accurate connections. This diagram will outline the specific wiring paths and color codes for each component.
Start by connecting the wiring harness from the turn signal switch to the corresponding wires on the turn signal lights. Depending on the kit, you may need to connect individual wires for the left and right turn signals, as well as the brake lights and hazard lights. Pay close attention to the wire colors and their respective connections.
Secure the wiring connections using electrical connectors or soldering, ensuring a reliable and secure bond. Proper insulation is essential to protect the connections from moisture and ensure long-lasting performance. Consider using heat shrink tubing or electrical tape to cover exposed wire ends.
Step 4: Connect to the Golf Cart’s Electrical System
To integrate the turn signals into your golf cart’s electrical system, you will need to connect the wiring to the appropriate components. This may involve connecting to the battery, key switch, fuse box, or existing wiring harness.
Refer to the wiring diagram provided with your turn signal kit to identify the specific connection points. Follow the instructions carefully to ensure correct wiring integration. Use electrical connectors, soldering, or crimping techniques to create secure and reliable connections.
During this step, it’s important to adhere to proper safety practices. Turn off the power supply to the golf cart and disconnect the battery before making any electrical connections. This will prevent electrical shock or short circuits.
Step 5: Test and Verify
After completing the wiring connections, it’s crucial to test the turn signals to ensure proper functionality. Reconnect the golf cart’s battery and turn on the power supply. Activate the turn signal switch and observe the lights for proper operation.
Test both the left and right turn signals, as well as the hazard lights and brake lights if applicable. Ensure that the lights illuminate brightly, blink at the correct speed, and automatically cancel after completing a turn.
Additionally, verify that all connections are secure and there are no loose wires or potential hazards. Take a short test drive to confirm the functionality of the turn signals in real-world conditions.
Tips for a Successful Wiring Installation
- Follow the Instructions: Carefully read and follow the instructions provided with your turn signal kit. Each kit may have specific requirements or recommendations for installation.
- Take Your Time: Wiring can be intricate, so take your time to ensure accurate connections. Double-check your work and troubleshoot any issues that arise.
- Use Quality Components: Invest in a reliable turn signal kit and use high-quality wiring and connectors to ensure long-lasting performance and durability.
- Consider Professional Help: If you’re not confident in your wiring abilities or encounter difficulties during the installation process, it’s always a good idea to seek professional assistance. A qualified technician or an experienced golf cart electrician can provide valuable guidance and ensure that the turn signals are properly wired for optimal functionality and safety.
- Regular Maintenance: Once the turn signals are installed, it’s important to incorporate regular maintenance into your golf cart routine. Inspect the wiring connections periodically for signs of wear or corrosion. Clean the turn signal lights to maintain clear visibility. Address any issues promptly to ensure continued functionality.
- Be Mindful of Local Regulations: Familiarize yourself with the local regulations and laws regarding the use of turn signals on golf carts. Different jurisdictions may have specific requirements regarding their installation and usage. Ensure that your turn signals comply with these regulations to avoid any potential legal issues.
By following these steps and tips, you can successfully wire turn signals on your golf cart, enhancing safety and visibility during your rides. Enjoy the added convenience and peace of mind that come with clear and effective turn signal indicators.
Remember, proper installation and maintenance of the turn signals are essential for safe operation. Always prioritize your safety and the safety of others when using your golf cart on public roads or in shared spaces.
Now it’s time to take the necessary steps to wire turn signals on your golf cart and enjoy safer travels. Indicate your intentions, be visible to others, and navigate with confidence. Happy driving!
Conclusion
Wiring turn signals on your golf cart is a valuable modification that enhances safety and visibility, allowing you to communicate your intentions to others on the road or in shared spaces. By following the step-by-step instructions provided in this guide, you can successfully install turn signals and enjoy a safer and more efficient driving experience.
Understanding the importance of turn signals and the benefits they offer, such as enhanced safety, improved visibility, and legal compliance, reinforces the significance of this modification. Installing turn signals on your golf cart allows you to navigate with confidence, whether you’re driving in a residential area, campground, or other public spaces.
Preparing for the wiring process by assessing your golf cart’s electrical system and selecting the right turn signal kit ensures a smooth and successful installation. Following the steps of installing the turn signal switch, mounting the turn signal lights, connecting the wiring, and integrating with the golf cart’s electrical system allows for a proper wiring setup.
Remember to follow safety practices, double-check connections, and test the functionality of the turn signals before hitting the road. If you encounter any difficulties or lack confidence in your wiring abilities, it’s always advisable to seek professional assistance.
By incorporating these turn signals into your golf cart, you enhance your own safety and the safety of those around you. Clear communication of your intentions reduces the risk of accidents and promotes smoother traffic flow. Drive with confidence, enjoy improved visibility, and navigate the roads with peace of mind.
Now it’s time to wire turn signals on your golf cart and experience the benefits of this important safety feature. Stay safe and enjoy your rides with enhanced visibility and communication.


