How To Address A Golf Ball With A Driver

Golf is a game that requires precision and technique. One of the most critical aspects of the game is the address, which is the way you position yourself and the golf club before hitting the ball. When it comes to using a driver, the address can be particularly challenging due to the size and weight of the club. Knowing how to address a golf ball with a driver is essential for any golfer who wants to improve their game.
In this article, we will explore the proper technique for addressing a golf ball with a driver. We will cover all the essential steps, including positioning your feet and body, gripping the club, and aligning the clubface. Additionally, we will provide some tips and tricks to help you refine your technique and achieve the best results possible.
Whether you are a beginner or an experienced golfer, mastering the proper address with a driver can significantly impact your game. By following the steps outlined in this article and practicing regularly, you can improve your accuracy, distance, and overall performance on the golf course. So, let’s dive in and learn how to address a golf ball with a driver like a pro!
Understanding the Basics of Addressing a Golf Ball with a Driver
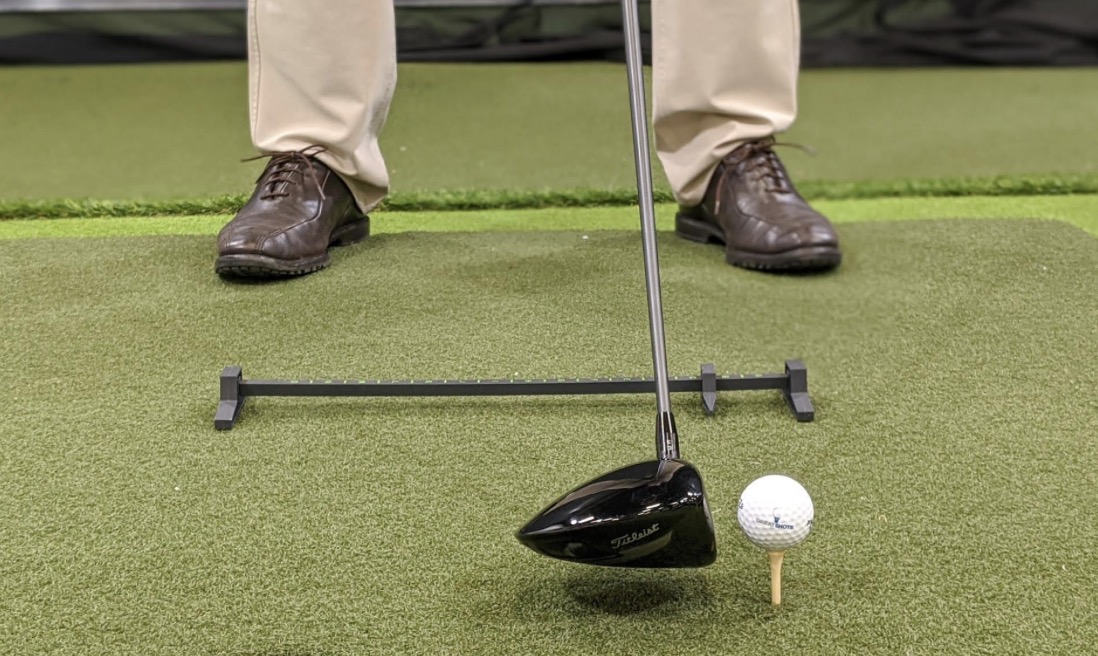
Before diving into the specifics, it’s important to understand the basics of addressing a golf ball with a driver. The address position is the position you take before swinging the club. In this position, your feet should be shoulder-width apart, and the ball should be positioned opposite the heel of your front foot. Your knees should be slightly bent, and your weight should be evenly distributed between both feet.
When it comes to holding the driver, the grip should be secure but not too tight. Your left hand (for right-handed players) should be on top of the grip, and your right hand should be below it. The clubface should be square to the target line, and the ball should be positioned at the tee height. Now that we’ve covered the basics let’s dive into the step-by-step process of how to address a golf ball with a driver.
Step-by-Step Process of Addressing a Golf Ball with a Driver
- Choose Your Target: Before addressing the ball, it’s essential to have a target in mind. Whether it’s a specific point on the fairway or the green, choosing your target will help you visualize your shot and set up your address position.
- Position Your Feet: As mentioned earlier, your feet should be shoulder-width apart. Position your front foot slightly ahead of the ball, and your back foot should be perpendicular to the target line.
- Align Your Body: Your body should be aligned parallel to the target line. Your shoulders, hips, and feet should be pointing in the same direction as your target.
- Bend Your Knees: Your knees should be slightly bent, and your weight should be evenly distributed between both feet. This will help you maintain balance throughout your swing.
- Position the Ball: The ball should be positioned opposite the heel of your front foot, and the tee should be set to the appropriate height.
- Grip the Club: Place your left hand on top of the grip and your right hand below it (for right-handed players). Your grip should be secure but not too tight.
- Square the Clubface: The clubface should be square to the target line, which means the face of the club is perpendicular to the target line.
- Take Your Stance: Once you’ve completed all the steps above, take a moment to ensure you’re comfortable and in the correct position. Your weight should be evenly distributed between both feet, and you should feel balanced and stable.
Before diving into the specifics of how to address a golf ball with a driver, it’s important to understand the basics of the driver and how it differs from other clubs. The driver, also known as the 1-wood, is typically the longest and lowest-lofted club in a golfer’s bag. It is primarily used for hitting the ball off the tee on long, straight holes.
When addressing the ball with a driver, there are a few key factors to keep in mind:
- Stance: The stance for a driver shot is wider than for most other clubs, with the feet positioned roughly shoulder-width apart. The ball should be teed up higher than for other clubs, so the golfer can hit it on the upswing.
- Ball Position: The ball should be positioned forward in the stance, closer to the lead foot. This helps the golfer hit the ball on the upswing and promotes a higher launch angle.
- Alignment: The golfer should aim the clubface directly at the target, with the feet, hips, and shoulders aligned parallel to the target line.
- Posture: The golfer should maintain a slight bend in the knees and hips, and tilt the spine away from the target to promote a sweeping motion through the ball.
- Grip: The grip for a driver shot should be light and relaxed, with the hands positioned lower on the grip than for other clubs.
- Swing: The driver swing is a sweeping motion that emphasizes a smooth, gradual acceleration through the ball. The golfer should aim to hit the ball on the upswing, making contact with the ball just before the bottom of the arc.
With these factors in mind, let’s take a closer look at how to address a golf ball with a driver.
I. Stance
- Position feet shoulder-width apart.
- Position ball off the lead foot and tee it higher.
- Knees and hips should be slightly flexed.
II. Alignment
- Aim the clubface directly at the target.
- Align feet, hips, and shoulders parallel to the target line.
III. Posture
- Tilt the spine away from the target.
- Maintain slight bend in knees and hips.
IV. Grip
- Light and relaxed grip.
- Hands positioned lower on the grip.
V. Swing
- Smooth, gradual acceleration through the ball.
- Hit the ball on the upswing, just before the bottom of the arc.
Following these guidelines for addressing a golf ball with a driver can help promote a higher launch angle and longer drives off the tee. However, it’s important to note that individual variations in swing technique and body type may require some adjustments to this general framework. As with all aspects of the golf swing, experimentation and practice are key to finding what works best for your own game.
Certainly! Here is the next section:
Tips for Addressing the Ball with a Driver
Addressing the ball with a driver requires a slightly different setup than with an iron. Here are some tips to help you set up correctly with a driver:
- Tee the ball up high: With a driver, you want to hit the ball on the upswing to maximize distance. Tee the ball up so that the equator of the ball is level with the top of the driver face.
- Stand further away from the ball: With a longer club like the driver, you need to stand further away from the ball to create a flatter swing plane. Stand with your feet shoulder-width apart and position the ball so that it is even with your front heel.
- Tilt your spine away from the target: Lean your upper body away from the target so that your trail shoulder is lower than your lead shoulder. This will help you hit up on the ball and launch it high into the air.
- Keep your hands ahead of the ball: Unlike with an iron, you want to hit the ball on the upswing with a driver. To achieve this, keep your hands ahead of the ball at impact.
- Keep your weight on your lead foot: As with an iron shot, you want to shift your weight onto your lead foot at impact. This will help you hit the ball on the upswing and launch it high into the air.
By following these tips, you can address the ball with a driver and set yourself up for a successful tee shot. Remember to practice your setup and swing to achieve consistency and accuracy on the course.
Sure! Here’s the next section:
Step 4: Start the Backswing
Once you’re in position and have your grip in place, it’s time to start your backswing. The backswing is important because it sets the foundation for the rest of your swing. Here’s how to start the backswing with a driver:
- Keep your left arm straight: As you start your backswing, make sure to keep your left arm straight. This will help ensure that you’re taking the club back on the right path and will prevent you from bringing the club too far inside.
- Turn your shoulders: As you begin your backswing, focus on turning your shoulders to initiate the movement. This will help you create a smooth and consistent swing.
- Keep your head still: It’s important to keep your head still throughout the backswing. Moving your head can cause you to lose your balance and affect your swing plane.
- Shift your weight: As you turn your shoulders, begin to shift your weight to your right side. This will help you create power and maintain your balance.
- Keep your wrists firm: Make sure to keep your wrists firm throughout the backswing. This will help you control the club and prevent you from flipping your wrists too early.
Remember, the backswing should be smooth and controlled. Avoid any jerky movements or quick swings. Focus on keeping your movements fluid and consistent.
Step 5: Transition to the Downswing
Once you’ve completed your backswing, it’s time to transition to the downswing. The downswing is where you generate the most power and speed, so it’s important to get this right. Here’s how to transition to the downswing:
- Start the downswing with your lower body: The downswing should be initiated by your lower body, specifically your hips and legs. Begin by shifting your weight back to your left side and turning your hips toward the target.
- Keep your arms close to your body: As you begin the downswing, make sure to keep your arms close to your body. This will help you maintain control of the club and prevent you from getting too far away from the ball.
- Use your core muscles: To generate power and speed, focus on using your core muscles to rotate your body through the downswing. This will help you maintain your balance and create a consistent swing.
- Release the club: As you come through the downswing, focus on releasing the club at the right time. This will help you achieve maximum speed and power at impact.
- Follow through: After you’ve made contact with the ball, make sure to follow through with your swing. A full follow-through will help you maintain your balance and generate more distance.
Remember, the downswing should be smooth and fluid. Avoid any jerky movements or quick swings. Focus on using your lower body and core muscles to generate power and speed through the swing.
Conclusion
Addressing a golf ball with a driver can be intimidating, but by following these steps and practicing regularly, you can improve your swing and gain more distance off the tee. Remember to focus on the fundamentals, maintain a good grip, and keep your movements smooth and consistent. With time and practice, you’ll be hitting long and straight drives in no time!