How To Remove Rust From Golf Club Shafts
As an avid golfer, you understand the importance of having well-maintained equipment to achieve peak performance on the course. One common issue that can hinder your game is the presence of rust on your golf club shafts. Rust not only affects the appearance of your clubs but can also compromise their functionality and durability over time.
In this comprehensive guide, we will walk you through the process of removing rust from golf club shafts, equipping you with the knowledge and techniques to restore your clubs to their former glory. Whether you’re a seasoned golfer or a beginner, understanding the causes of rust, the signs to look out for, and the proper removal methods is essential for keeping your clubs in optimal condition.
Throughout this article, we will provide step-by-step instructions, valuable tips, and insights to ensure that you approach rust removal with confidence and precision. From gathering the necessary materials to preparing the workspace, inspecting the extent of rust, and employing effective cleaning techniques, we’ve got you covered.
By investing a little time and effort into rust removal, you can enhance your golfing experience and prolong the lifespan of your beloved clubs. So, let’s dive into the world of rust removal from golf club shafts and reclaim the performance and elegance of your clubs on the green.
Understanding Rust on Golf Club Shafts
Before we delve into the rust removal process, let’s explore what causes rust on golf club shafts and why it is crucial to address this issue promptly.
Rust occurs when iron or steel reacts with oxygen and moisture, forming iron oxide. Golf club shafts, typically made of steel, are susceptible to rust when exposed to humid or damp conditions. Moreover, if your clubs are not properly cleaned and stored, rust can gradually develop, compromising their performance.
Signs of rust on golf club shafts include discoloration, pitting, and roughness on the surface. If left untreated, rust can weaken the shafts and affect your grip, swing, and overall control over the club.
Preparing for Rust Removal
Before you embark on the rust removal process, it’s essential to gather the necessary materials and ensure a suitable workspace.
Materials You’ll Need
| Material | Description |
|---|---|
| Soft cloth or towel | For wiping and drying the shaft |
| Fine-grade steel wool | To remove surface rust |
| Rust remover solution or vinegar | For effective rust removal |
| Rubber gloves | To protect your hands during the process |
| Toothbrush or small brush | For scrubbing the rusted areas |
Ensuring Proper Ventilation and Workspace
To create a safe and well-ventilated environment for rust removal, consider performing the process outdoors or in a well-ventilated area. Adequate ventilation will help dissipate any fumes that may arise from the rust remover solution or vinegar.
Additionally, prepare a clean and clutter-free workspace where you can comfortably work on your golf club shafts. Removing any obstacles will allow for smooth and efficient rust removal.
Removing the Golf Club Head (if necessary)
In some cases, it may be necessary to detach the golf club head from the shaft to facilitate the rust removal process. This step is particularly relevant if the rust has spread to the connection between the shaft and the club head. Follow the manufacturer’s instructions or consult a professional if you are unsure about removing the club head.
Now that we’ve prepared our workspace and gathered the necessary materials, let’s move on to the actual rust removal process.
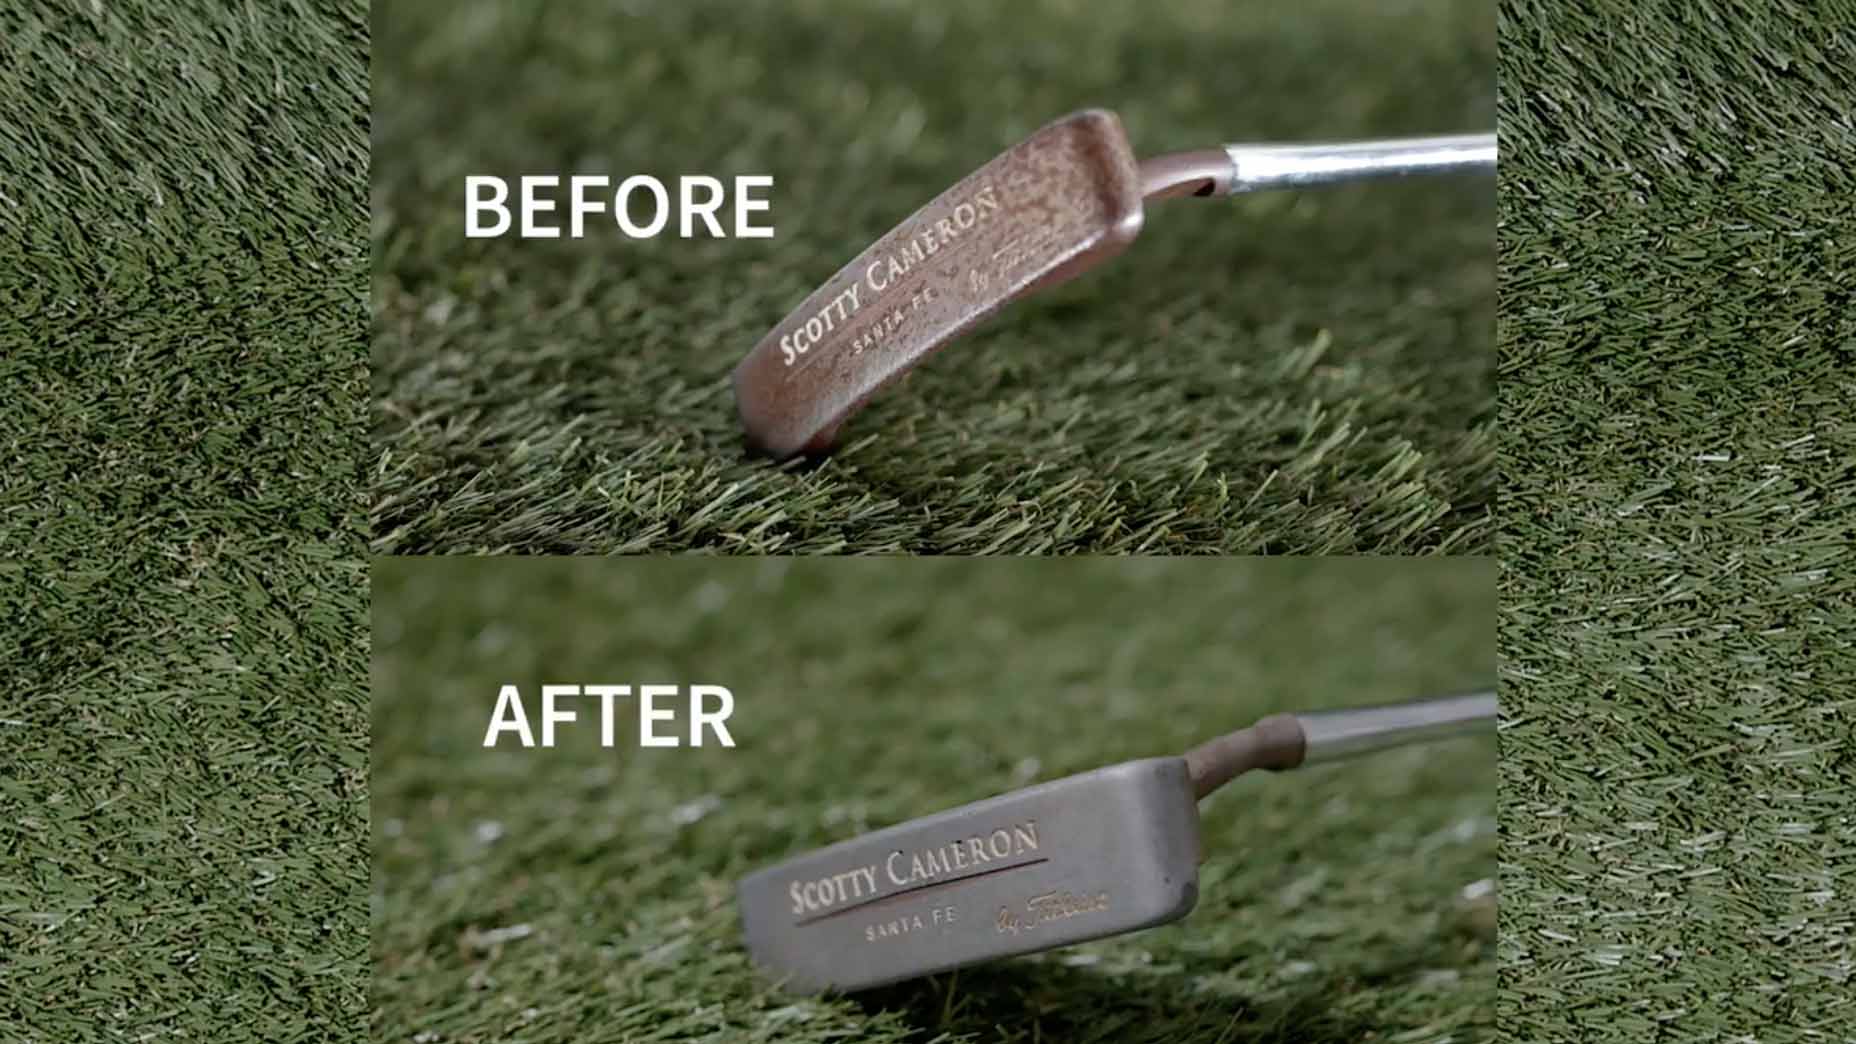
Cleaning the Golf Club Shafts
Removing rust from golf club shafts involves several steps to ensure thorough cleaning and restoration. Let’s dive into each step in detail.
Step 1: Inspection and Assessment
Before you begin the rust removal process, it’s crucial to inspect the golf club shafts and assess the extent of rust and any additional damage. By doing so, you can tailor your cleaning approach accordingly.
Carefully examine the shafts, looking for areas with visible rust, discoloration, or pitting. Note any sections that require extra attention and evaluate whether there are any other damages that might affect the performance of your golf clubs.
Step 2: Removing Loose Rust
To start the cleaning process, use a soft cloth or towel to gently wipe the surface of the golf club shafts. This will help remove any loose rust particles and debris. Be careful not to apply excessive pressure, as this may cause scratches or damage the shaft.
After wiping away loose rust, take a fine-grade steel wool pad and rub it gently along the shaft. The fine-grade steel wool will effectively eliminate surface rust, restoring the smoothness of the shaft.
Step 3: Applying Rust Remover Solution or Vinegar
To tackle more stubborn rust, it’s time to bring out a rust remover solution or vinegar. Both options can effectively break down rust and facilitate its removal from the golf club shafts.
Rust Remover Solution: You can find rust remover solutions specifically designed for rust removal in hardware stores or online. Follow the instructions provided with the product for the best results. Typically, the process involves soaking a cloth in the rust remover solution and wrapping it around the rusted areas of the shaft. Allow the solution to sit for the recommended time to allow it to penetrate and dissolve the rust.
Vinegar: If you prefer a natural and readily available alternative, vinegar can be used as a rust remover. Fill a container with white vinegar and submerge the rusted portion of the golf club shaft in the vinegar. Allow it to soak for several hours or overnight, depending on the severity of the rust. The acidity of the vinegar helps break down the rust, making it easier to remove.
Step 4: Scrubbing the Rusted Areas
After allowing the rust remover solution or vinegar to work its magic, it’s time to scrub away the remaining rust. Take a toothbrush or a small brush with soft bristles and gently scrub the rusted areas of the golf club shafts. Apply gentle pressure while scrubbing to avoid damaging the shaft.
Focus on the areas with the most significant rust accumulation, ensuring thorough cleaning. Continue scrubbing until the shaft feels smooth to the touch.
Step 5: Wiping and Drying the Shaft
Once you have completed the rust removal process, take a clean cloth and wipe the golf club shafts to remove any residue from the rust remover solution or vinegar. Ensure that the shafts are completely dry before reassembling the golf clubs. Moisture can lead to further rusting if not properly dried.
Allow the shafts to air dry naturally or use a soft cloth to speed up the drying process. Make sure there is no moisture remaining on the shafts before moving on to the reassembly stage.
Reassembling the Golf Club
After successfully removing rust from the golf club shafts, it’s time to reassemble the clubs and prepare them for your next game. Follow these steps to ensure a proper reassembly:
Cleaning and Inspecting the Club Head
Before attaching the club head to the shaft, take a moment to clean and inspect it. Wipe the club head with a soft cloth to remove any dirt or debris that may have accumulated during the rust removal process. Additionally, inspect the club head for any signs of damage or wear that may require further attention or professional repair.
Applying Protective Coatings (Optional)
To provide an extra layer of protection against future rust formation, you can consider applying a protective coating to the golf club shafts. Several products on the market, such as rust inhibitors or specialized club coatings, can help prevent rust and corrosion.
Follow the instructions provided with the chosen coating and apply it evenly to the cleaned and dried shafts. Allow the coating to dry completely before proceeding with the reassembly.
Reattaching the Club Head to the Shaft
Once the protective coating is dry, carefully align the club head with the shaft and reattach them according to the manufacturer’s instructions. Ensure that the connection is secure and tight, but be cautious not to overtighten, as this may cause damage to the club or shaft.
With the club head successfully reattached, you have completed the rust removal process and reassembly of your golf club.
Preventing Future Rust
Now that your golf club shafts are rust-free, it’s essential to implement preventive measures to keep them in optimal condition for a longer period. Here are some tips to help you prevent future rust:
Regular Cleaning and Maintenance Practices
Make it a habit to clean your golf clubs after each use. Use a soft cloth or towel to wipe down the shafts and club heads, removing any dirt, debris, or moisture. Pay extra attention to areas prone to rust, such as the connection between the shaft and the club head.
Additionally, consider using a mild soap or golf club cleaning solution to further remove any stubborn stains or residues. Follow the manufacturer’s instructions and avoid using harsh chemicals that may damage the club’s finish.
Storing Clubs in a Dry Environment
Proper storage is crucial in preventing rust formation on your golf club shafts. Store your clubs in a dry location, away from high humidity or moisture. Avoid leaving them in damp areas such as basements, garages, or areas prone to water leakage.
Investing in a golf club bag with individual club compartments or using club head covers can provide extra protection against dust, moisture, and potential rust. Ensure that the clubs are dry before placing them in the bag or covers to prevent trapping moisture.
Applying Protective Coatings or Lubricants
As mentioned earlier, applying protective coatings to the golf club shafts can help prevent rust formation. Look for specialized rust inhibitors or coatings designed specifically for golf club maintenance. Follow the manufacturer’s instructions for application and reapplication intervals.
Alternatively, you can use lubricants, such as silicone or WD-40, to create a barrier against moisture and rust. Apply a small amount of lubricant to a cloth and gently rub it onto the shaft, focusing on vulnerable areas. Be sure to wipe off any excess lubricant to avoid affecting your grip during play.
Professional Club Maintenance and Servicing
Consider taking your golf clubs for professional maintenance and servicing at least once a year or as needed. Professionals have specialized tools and expertise to inspect and clean your clubs thoroughly, ensuring they are in optimal condition.
During professional servicing, they can also address any minor damage or wear that may lead to rust formation. It’s an opportunity to have your clubs checked, adjusted, and re-gripped if necessary, enhancing their performance and lifespan.
By following these preventive measures and incorporating regular maintenance into your golf club care routine, you can minimize the risk of rust and enjoy your clubs for years to come.
Conclusion
Maintaining rust-free golf club shafts is essential for preserving their performance and longevity. By understanding the causes of rust, preparing adequately, and following the step-by-step rust removal process outlined in this article, you can effectively restore your clubs and prevent future rust formation.
Remember to inspect your golf club shafts regularly, clean them after each use, and store them in a dry environment. Applying protective coatings, utilizing lubricants, and seeking professional servicing when needed will contribute to the overall care and maintenance of your golf clubs.
By investing time and effort into preserving your golf clubs, you can ensure a consistent and enjoyable golfing experience, free from the detrimental effects of rust. So, grab your clean and rust-free clubs, head to the course, and swing with confidence!